
Web server setup using Docker
Docker
is a container management service. The keywords of Docker are develop, ship and run anywhere. The whole idea of Docker is for developers to easily develop applications, ship them into containers which can then be deployed anywhere. The initial release of Docker was in March 2013 and since then, it has become the buzzword for modern world development, especially in the face of Agile-based projects.
Docker Features
- Docker could reduce the size of development by providing a smaller footprint of the operating system via containers.
- With containers, it becomes easier for teams across different units, such as development, QA, and Operations to work seamlessly across applications.
- You can deploy Docker containers anywhere, on any physical and virtual machines and even on the cloud.
- Since Docker containers are lightweight, they are very easily scalable.
Docker Components
- Docker for Mac − It allows one to run Docker containers on the Mac OS.
- Docker for Linux − It allows one to run Docker containers on the Linux OS.
- Docker for Windows − It allows one to run Docker containers on the Windows OS.
- Docker Engine − It is used for building Docker images and creating Docker containers.
- Docker Hub − This is the registry which is used to host various Docker images.
- Docker Compose − This is used to define applications using multiple Docker containers.
How to build a web server image which can be used to build containers:
In our example, we are going to use the Apache Web Server on Ubuntu to build our image. Let us follow
the steps given below, to build our web server Docker file.
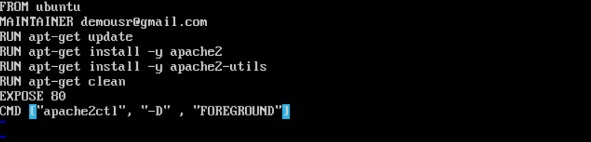
Step 1 − The first step is to build our Docker File. Let us use vim and create a Docker File with
the
following information.
            FROM ubuntu
            RUN apt-get update
            RUN apt-get install –y apache2
            RUN apt-get install –y apache2-utils
            RUN apt-get clean
            EXPOSE 80 CMD [“apache2ctl”, “-D”, “FOREGROUND”]
-
The following points need to be noted about the above statements −
- We are first creating our image to be from the Ubuntu base image.
- Next, we are going to use the RUN command to update all the packages on the Ubuntu system.
- Next, we use the RUN command to install apache2 on our image.
- Next, we use the RUN command to install the necessary utility apache2 packages on our image.
- Next, we use the RUN command to clean any unnecessary files from the system.
- The EXPOSE command is used to expose port 80 of Apache in the container to the Docker host.
- Finally, the CMD command is used to run apache2 in the background.
Now that the file details have been entered, just save the file.
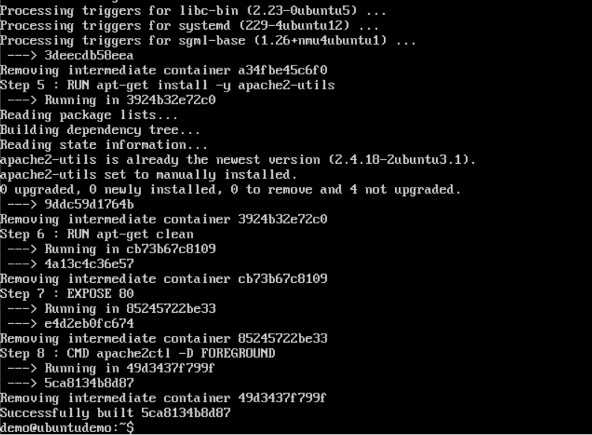
Step 2− Run the Docker build command to build the Docker file. It can be done using the following command −
sudo docker build –t=”mywebserver” .
We are tagging our image as mywebserver. Once the image is built, you will get a successful message that the file has been built.
Step 3− Now that the web server file has been built, it’s now time to create a container from the image. We can do this with the Docker run command.
sudo docker run –d –p 80:80 mywebserver
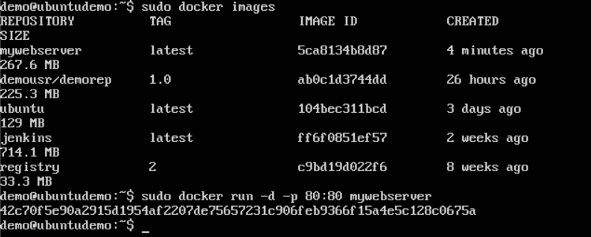
The following points need to be noted about the above command −
- The port number exposed by the container is 80. Hence with the –p command, we are mapping the same port number to the 80 port number on our localhost.
- The –d option is used to run the container in detached mode. This is so that the container can run in the background.